Back in college, I lived with 4 other guys in an older house. We all had A/C units and all liked to live and sleep in sub-70 temperatures. Needless to say, we popped breakers quite often. While we could quickly and easily reset the breaker, I had a PC tower that lost power and needed to be restarted every time a breaker popped. The solution: a UPS. To be more specific, I bought a Geek Squad 1500VA aka GS-1500u aka re-branded CyberPower 1500VA.
2 years later, I moved out of the house into an apartment. When I moved into the apartment, I plugged in the UPS and experienced symptoms where the screen would flash when trying to turn it on. After trying various things on my own, I searched Google, but found nothing helpful. I ended up giving up- at the time, having a UPS wasn't a huge need for me as my new apartment didn't have the power struggles I experienced in the old house.
Fast forward to present day (3.5 years later). I just bought a house (yay me) and for whatever reason decided to take another stab at fixing the UPS. I can't believe I dragged it along with me all this time. After doing more Googling today, I found a post on fixya.com which contained comments with a link to a YouTube video.
Fast forward to present day (3.5 years later). I just bought a house (yay me) and for whatever reason decided to take another stab at fixing the UPS. I can't believe I dragged it along with me all this time. After doing more Googling today, I found a post on fixya.com which contained comments with a link to a YouTube video.
The video describes exactly my symptoms, but alas it appeared nobody had found the problem and thus the solution. In my frustration, I smacked the side of the UPS and low and behold, it started working! I would describe my level of excitement as being somewhere between Ben Stein and a moderately spoiled teenage girl who has just been gifted a brand new BMW. As I lifted the UPS to move it, it went back into it's flashy, not working state. After setting it back down, smacking it around a bit, my educated guess was some flaky wire connection.
The Solution (and story continued...)
I popped open the black front cover:
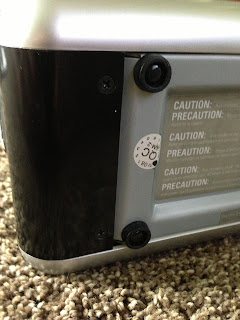
- 2 small black screws on the underside of the black front cover (see pic below)
- slide down the black part of the front cover about 1/2", then pull straight out
Directly behind the front cover, I observed the battery and connecting wires.
I nudged these wires around a bit and realized they were the culprit. After taking the battery out and looking at the connectors, I realized the only thing needed was a tighter connection. I simply crimped the female connectors on both red and black wires. Put it all back together and you've fixed your otherwise useless hunk of plastic!
As I mentioned before, I am a new homeowner. This is my first blog post, but I intend to have many more. I hope you enjoyed reading!
Cheers, Jeff


Thank you, seems to have worked for me as well. :)
ReplyDeleteNice catch. Did yours stay fixed? Mine initially started charging again, but went back to flashing within a few hours. Considering twisting the copper together.
ReplyDeleteThanks Jeff. This was helpful but I ended up cracking my front cover clips as I forcefully pulled it horizontally rather than vertically :( my mistake and would suggest to add that small detail in your instructions. In my case I think I will need to replace both batteries as i see some leaking after opening it up.
ReplyDeleteThis type of fix is very common for many "broken" items. I can now fix damn near anything. I started taking apart my parent's clock radios and various other "broken" items when I was a teen. 40 years later I can't think of any household item I have not fixed myself with relative ease. most often it is a simple thing like a loose connection, a bad soldering joint. Nowadays with YouTube the job os even easier because there is likely someone with the same model as your broken item and specific problem that made a video to help you. Good job taking the dive and becoming more self-sufficient. I've saved a small fortune over the years. my neighbors all love me too because I fix all their stuff too.
ReplyDeleteThanks for this post. I figured it was something like this, but you confirmed it for me.
ReplyDeleteThank you. Saved our church another $150 for new ups. God Bless.
ReplyDeleteAwesome, I love repairing electronics, etc. I will probably spend the nest week trolling this site. I'm looking at this same one on craigslist for $35.
ReplyDeleteHi Jeff! Are you reffering to the wires that connects to the battery or the button control board with the rainbow wires? mine still flickers after changing the battery
ReplyDeleteWhat is the model number for replacing the battery inside the GS-1500U UPS?
Deletehttps://batteryclerk.com/products/geek-squad-gs-1500u-12v-9ah-ups-battery?
DeleteAWESOME THE PROMOTION OF GIRL BEAUTIFUL SALES KLIK HERE SABUNG AYAM
ReplyDeleteGOOD PRICE AND CHEAP
http://www.gorengayam.net
PLEASE PRICE DIRECTLY
http://bakarayammarketing.blogspot.com/2018/08/telur-puyuh-berubah-menjadi-andalan.html
========================================================
INFO SEPUTAR SABUNG AYAM
SABUNG AYAM
SABUNG AYAM ONLINE
SABUNG AYAM BANGKOK
SABUNG AYAM FILIPINA
Trik Menang Bermain Situs Judi Sabung Ayam Online Yang Jarang Diketahui Klik Di Sini
ReplyDeleteInformasi Terlengkap Mengenai Sabung Ayam
https://ayamsatebv.blogspot.com/2018/12/4-ciri-ciri-ayam-jago-yang-hebat-pada.html/
DAFTAR ID SABUNG AYAM ONLINE
ReplyDeleteDAFTAR ID SBOBET
I hold the display button for 10 seconds or 15.when i turn on and it stop flashing.
ReplyDeleteunfortunately, this did not work for me. i can remove both batteries, and it still flashes & clicks when plugged in.
ReplyDelete